2013年5月31日 星期五

I made a change on VtkImageViewer / QVtkWidget, but nothing happened until I click on it or do other things

Something like this


Solution :

  • Whenever you make changes to VTK's data objects it's your job to call qvtkWidget->update() or viewer->Render() afterward so the new changes get put onto the screen.

The most convenient way is to call the Render( ) method of VtkImageViewer

  • When you change the vtkImageData which is the VtkImageViewer's Input
  • When you need to change the showing slice( most of time is a 3D Data )  
  • Blah, blah
---------> Call Render( )


2013年5月30日 星期四

A class Inherited from QLabel as a OpenCV cv::Mat Image Viewer

This one is a continuation  of Show OpenCV Image on QLabel( QImage )

Why Need This?

  • If you have a cv::Mat Image, and Qt is your Gui Helper, then How About Showing A cv::Mat Image on YOUR Gui?
  • After Showing a cv::Mat Image on your Gui, Why NOT That let User to interact with it?

What We Need.

  • A Be-Ready OpenCV Library
  • A Already-Can-Use QT Environment

What We're Gonna Do.

  • Inheriting A QLabel Class   ----> QcvMatImageLabel
  • Show the cv::Mat Image Pixel Value and Current Curor location on LineEdits
  • Override the Mouse Move, Press, and Release Events

How???

  • Header File of QcvMatLabel
#ifndef QCVMATLABEL_H
#define QCVMATLABEL_H

#include <QtGui>
#include <cv.h>
#include <highgui.h>

class QcvMatImageLabel : public QLabel
{
    Q_OBJECT

public:
 QcvMatImageLabel (QWidget *parent = 0) : QLabel(parent),
  cursorLocLineEdit( NULL ),
  pixelValLineEdit( NULL ),
  matImage( NULL )
 {
  this->setMouseTracking(true);
 }
 virtual ~QImageLabel( ){
  cursorLocLineEdit = NULL;
  pixelValLineEdit = NULL;
  matImage = NULL;
 }
 void setCvImage( cv::Mat _cvImage ){ matImage = _cvImage; }
 void setCursorLineEdit( QLineEdit *theLineEdit ){ cursorLocLineEdit = theLineEdit; }
 void setPixelValLineEdit( QLineEdit *theLineEdit ){ pixelValLineEdit = theLineEdit; }

 int getPosX() const{ return pos_x; }
 int getPosY() const{ return pos_y; }
protected:
 void mouseMoveEvent( QMouseEvent *ev );
 void mousePressEvent( QMouseEvent *ev );
 void mouseReleaseEvent(QMouseEvent *ev);
 static QImage MatToQImage(const cv::Mat& mat);
 
 QLineEdit *cursorLocLineEdit; // show cursor location, i.e. pixel index
 QLineEdit *pixelValLineEdit; // show cv::Mat Image Gray/RGB value
 cv::Mat matImage;  // current cv::Mat image
 int pos_x;   // current cursor position
 int pos_y;   // current cursor position
};
#endif // QCVMATLABEL_H


this->setMouseTracking(true);

  • Source Code of QcvMatLabel
#include "qcvmatimagelabel.h"
void QcvMatImageLabel::mouseMoveEvent( QMouseEvent *ev ){
 int x = ev->pos( ).x();
 int y = ev->pos( ).y();
 pos_x = x; pos_y = y;
 if( cursorLocLineEdit != NULL && cursorLocLineEdit->isEnabled( ) )
  cursorLocLineEdit->setText( QString( "[ %1 , %2 ]" ).arg( x ).arg( y ) );
 
 if( pixelValLineEdit != NULL && pixelValLineEdit->isEnabled( ) &&  !matImage.empty( ) ){
  pixelValLineEdit->setText( QString( "%1" ).arg( matImage.at<uchar>(y,x) ) );
  if( matImage.channels() == 3 )
   pixelValLineEdit->setText( QString( "%1 %2 %3" ).arg( matImage.at<cv::Vec3b>(y,x)[0] )
   .arg( matImage.at<cv::Vec3b>(y,x)[1] )
   .arg( matImage.at<cv::Vec3b>(y,x)[2] ));
 }

}
void QcvMatImageLabel::mousePressEvent( QMouseEvent *ev ){
 int x = ev->pos( ).x();
 int y = ev->pos( ).y();
 
 // m_mousePressed = true;
 
 // Do Whatever You Want...
 // Maybe draw a circle on this location on cv::Mat image
}
void QcvMatImageLabel::mouseReleaseEvent(QMouseEvent *ev){
 // Usually, this shares a member variable "m_mousePressed"
 // with mousePressEvent() method.
 // If User presses on image then the mousePressEvent( )
 // will be called and set m_mousePressed to be true.
 // Then this method can use a "if" condition to check
 // and do things like this...
 
 /*
 if( m_mousePressed == true ){
  // Do Whatever You Want...
  // ...
  
  m_mousePressed = false;
 }
 */
}
QImage QcvMatImageLabel::MatToQImage(const cv::Mat& mat)
{
 // check Show OpenCV Image on QLabel( QImage )
}

  • Using QcvMatLabel
  1. Creating a Widget On Your Gui

    drag a QLabel to your gui


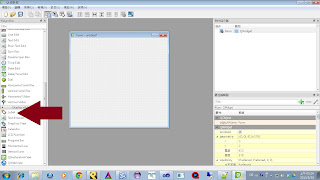
    change the width and height to your cv::Mat image has


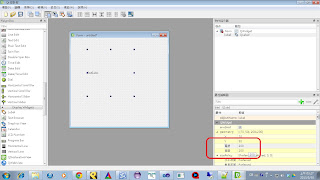
    change the background color( not necessary )


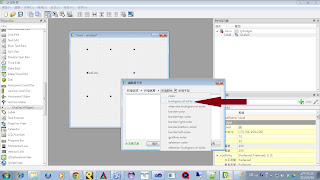
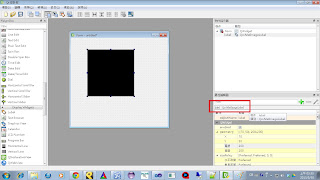
    promote QLabel to QcvMatLabel( very important!!! )


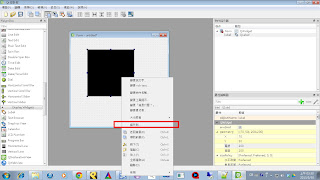
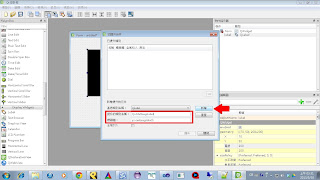
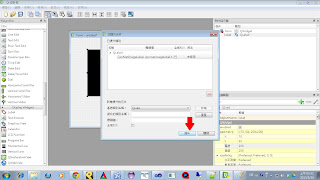
    If thing successes, the widget type will look like this
  2. Coding
1
2
3
4
5
6
7
8
// Declare a cv::Mat image
cv::Mat srcMat = cv::imread( "Source.jpg" );

// setting up the member variables of QcvMatImage goes here.
// ...

// show cv::Mat image on QLabel
theQcvMatImageLabel->setPixmap( QPixmap::fromImage( MatToQImage( srcMat ) ) );


More About Mouse Event...

Sometimes, our target may be 3D image data set. Under this case, we can use mouse wheel to change the current slice to show. The most important thing is overriding this method:

protected:
void wheelEvent
QWheelEvent *event );

And the definition may look like this

void QcvMatImageLabel::wheelEvent( QWheelEvent *event ){
 int wheelDegree = event->delta();
 int sliceOffSet = -( wheelDegree / 120 );
 int newSliceNum = current_slice_number + sliceOffSet;
 if( newSliceNum < 0 ) newSliceNum = 0;
 if( newSliceNum > maximum_slice_number ) newSliceNum = maximum_slice_number;
 // Change-showing-slice code goes here...
 // ...
}

wheelDegree is the degree of wheel scrolled on this wheel event
sliceOffSet used as a offset to be added on current slice number


About Key Event


Have Fun!

2013年4月14日 星期日

Clustering data sets into unknown number of groups

如何把三維的點集合進行分類,但是幾類是未知的?

Surfing online...
  1. 漫谈 Clustering (5): Hierarchical Clustering  http://blog.pluskid.org/?p=407
  2. Cluster analysis  http://en.wikipedia.org/wiki/Cluster_analysis
  3. Unsupervised Learning — Clustering Analysis  http://c3h3notes.wordpress.com/2010/10/29/unsupervised-learning-clustering-analysis/
  4. Unsupervised clustering with unknown number of clusters   http://stackoverflow.com/questions/10136470/unsupervised-clustering-with-unknown-number-of-clusters
  5. Hierarchical Clustering與K-Means Clustering   http://sls.weco.net/blog/chang/14-nov-2008/11503
  6. Hierarchical clustering algorithm   https://sites.google.com/site/dataclusteringalgorithms/hierarchical-clustering-algorithm
  7. Hierarchical clustering using C++   http://blog.o-x-t.com/2009/01/23/hierarchical_clustering/
  8. HIERARCHICAL CLUSTERING ALGORITHMS   http://cgm.cs.mcgill.ca/~soss/cs644/projects/siourbas/sect5.html
  9. C/C++ Machine Learning Libraries for Clustering   http://stackoverflow.com/questions/815423/c-c-machine-learning-libraries-for-clustering
  10. Agglomerative Clustering?   http://itk-insight-users.2283740.n2.nabble.com/Agglomerative-Clustering-td3342283.html
  11. hierarchical clustering using flann in opencv   http://stackoverflow.com/questions/15549001/hierarchical-clustering-using-flann-in-opencv
  12. Hierarchical k-Means in OpenCV without knowledge of “k”   http://stackoverflow.com/questions/5461357/hierarchical-k-means-in-opencv-without-knowledge-of-k


Lots of algorithm/solution can be googled....I think the most appropriate is ---> Hierarchical clustering

2013年4月6日 星期六

ITK VTK QT OpenCV Coding 架構


主要功能

  • ITK:
    Segmentation, Read in images, Write out images, Blah, Blah....
  • VTK:
    Show image on VTK window, Render 3D model, Blah...
  • Qt:
    Gui, Blah...
  • OpenCV:
    2D Image Processing, Read in 2D image, Write out 2D image, Show 2D image on OpenCV window, Blah...

主要架構

ITK +OpenCV <===> VTK + OpenCV <===> Qt + OpenCV 
  1. 建立一個ITK和OpenCV專用的Class
    負責最主要影像的處理
    會回傳ITK image
    會回傳OpenCV image
  2. 建立專用VTK和OpenCV的Class
    用來收ITK處理後及OpenCV處理後的影像
    會送出VTK image和OpenCV image
  3. 建立Qt的GUI,專門收VTK的影像和OpenCV的影像
    VTK to Qt -> 藉由QVtkWidget顯示
    OpenCV image to Qt Qimage -> 藉由一個轉換的method (在此) ,顯示在QLabel上

Programming   Form User View to Programmer View

Class Q
  • Using Library
    Qt Library -----> Qt widget
    VTK Library -----> QVtkWidget vtkEventQtSlotConnect
    OpenCV Library -----> show QImage from cv::Mat
  • get VTK image
  • get cv::Mat
  • Show on QVtkWidget or QLabel
Class V
  • Using Library
    VTK Library
    OpenCV Library
    ITK Library
  • get ITK image
  • send VTK image
  • get and send cv::Mat
  • CONVERT ITK image to VTK image
  • For cv::Mat, this class is just a relay
Class I
  • Using Library
    ITK Library
    OpenCV Library
  • produce and send ITK image
  • produce and send cv::Mat
[Note : Only the OpenCV Library shows on every Class. It can be excluded if it is not needed.]

還有....

  1. 這三個Class可以在同一個方案下,但是在三個不同的專案中建立。
  2. 三個專案可以個別編譯,不互相影響,利用互相Linking的方式,可以加快編譯的時間,且Class的封裝性更佳!

2013年4月4日 星期四

PCH 警告: 標頭停駐點不可以在巨集或 #if 區塊內


IntelliSense: PCH 警告: 標頭停駐點不可以在巨集或 #if 區塊內。未產生 IntelliSense PCH 檔案。

只要有任何地方Include他,就不會出現了!

http://proglab-justin.blogspot.tw/2012/01/intellisense-pch-warning-header-stop.html

2013年3月25日 星期一

Show OpenCV Image on QLabel( QImage )

First Part - Convert a OpenCV image to A QImage

by qt-opencv-multithreaded project

/************************************************************************/
/* qt-opencv-multithreaded:                                             */
/* A multithreaded OpenCV application using the Qt framework.           */
/*                                                                      */
/* MatToQImage.cpp                                                      */
/*                                                                      */
/* Nick D'Ademo <nickdademo@gmail.com>                                  */
/*                                                                      */
/* Copyright (c) 2012 Nick D'Ademo                                      */
/*                                                                      */
/* Permission is hereby granted, free of charge, to any person          */
/* obtaining a copy of this software and associated documentation       */
/* files (the "Software"), to deal in the Software without restriction, */
/* including without limitation the rights to use, copy, modify, merge, */
/* publish, distribute, sublicense, and/or sell copies of the Software, */
/* and to permit persons to whom the Software is furnished to do so,    */
/* subject to the following conditions:                                 */
/*                                                                      */
/* The above copyright notice and this permission notice shall be       */
/* included in all copies or substantial portions of the Software.      */
/*                                                                      */
/* THE SOFTWARE IS PROVIDED "AS IS", WITHOUT WARRANTY OF ANY KIND,      */
/* EXPRESS OR IMPLIED, INCLUDING BUT NOT LIMITED TO THE WARRANTIES OF   */
/* MERCHANTABILITY, FITNESS FOR A PARTICULAR PURPOSE AND                */
/* NONINFRINGEMENT. IN NO EVENT SHALL THE AUTHORS OR COPYRIGHT HOLDERS  */
/* BE LIABLE FOR ANY CLAIM, DAMAGES OR OTHER LIABILITY, WHETHER IN AN   */
/* ACTION OF CONTRACT, TORT OR OTHERWISE, ARISING FROM, OUT OF OR IN    */
/* CONNECTION WITH THE SOFTWARE OR THE USE OR OTHER DEALINGS IN THE     */
/* SOFTWARE.                                                            */
/*                                                                      */
/************************************************************************/

#include "MatToQImage.h"

QImage MatToQImage(const Mat& mat)
{
    // 8-bits unsigned, NO. OF CHANNELS=1
    if(mat.type()==CV_8UC1)
    {
        // Set the color table (used to translate colour indexes to qRgb values)
        QVector<QRgb> colorTable;
        for (int i=0; i<256; i++)
            colorTable.push_back(qRgb(i,i,i));
        // Copy input Mat
        const uchar *qImageBuffer = (const uchar*)mat.data;
        // Create QImage with same dimensions as input Mat
        QImage img(qImageBuffer, mat.cols, mat.rows, mat.step, QImage::Format_Indexed8);
        img.setColorTable(colorTable);
        return img;
    }
    // 8-bits unsigned, NO. OF CHANNELS=3
    if(mat.type()==CV_8UC3)
    {
        // Copy input Mat
        const uchar *qImageBuffer = (const uchar*)mat.data;
        // Create QImage with same dimensions as input Mat
        QImage img(qImageBuffer, mat.cols, mat.rows, mat.step, QImage::Format_RGB888);
        return img.rgbSwapped();
    }
    else
    {
        qDebug() << "ERROR: Mat could not be converted to QImage.";
        return QImage();
    }
} // MatToQImage()


Second Part - Show on QLabel

How to show a QImage on a QLabel ? 

  http://www.qtcentre.org/threads/16160-display-QImage-on-QLabel

  1. QImage image(320, 240, QImage::Format_Indexed8);
  2. image.setColorTable(colors);
  3. image.fill(2);
  4. QLabel label;
  5. label.setPixmap(QPixmap::fromImage(image));
  6. label.show();

2013年2月27日 星期三

ITK + VTK + QT on Window 7 64bit and Visual Studio 2010 Pro 32bit project


STEP ONE

STEP TWO

  • Organize Source code
    • the recommended tree like this - 
      • library
        • library_version_number
          • library_source_code
          • library_build_platform1
          • library_build_platform2
          • library_build_platformX
    • for example:
    • prons:
      • organized and the binary codes for different platforms can be separated from each other
      • easy maintenance
      • easy upgrade

STEP THREE  (main part of this tutorial)

<<build a 32bit environment>> 

  1. build QT -> already done, leave this directory alone!!
  2. build ITK
    1. CMAKE PART
      • using CMake to build the visual studio 2010 32-bit environment
      • fill up the paths of source code and binary
      • click the "Configure" button
      • choose "Visual Studio 2010" and "Use default native compilers" and then click "Finish"
      • wait a few minutes....
      • Generally speaking, the message will show "Configuring done" like this snapshot:
      • Remember: Just leave default setting, because those unchecked items are not being used here for now.
      • click "Generate" button and wait for the "Generate done" message
    2. VISUAL STUDIO PART
      • go to the build directory, e.g. "C:\itk\itk-4.2.1\vs10"
      • open "ITK.sln"
      • build them all under the Debug mode and Release mode
      • wait a few minutes....( at lease one hour, depend on your machine )
      • NOTE HERE: building on the release mode is necessary, because if we want to combine ITK and QT together, visual studio project need to be under the Release mode!!This is a tricky part.
      • Until all the project being built successfully, the building process is over.
  3. build VTK( careful! )
    1. CMAKE PART
      • using CMake to build the visual studio 2010 32-bit environment
      • fill the paths of source code and binary up
      • click the "Configure" button
      • choose "Visual Studio 2010" and "Use default native compilers" and then click "Finish"
      • wait a few minutes....
      • Generally speaking, the message will show "Configuring done" like this snapshot:
      • BE CAREFUL: 
        • CHECK BUILD_EXAMPLES ( for QT + VTK project test )
        • CHECK BUILD_SHARED_LIBS ( for VTK work with QT )
        • CHECK VTK_USE_QT ( for VTK library to build QT-related components)
        • CHECK VTK_USE_GUISUPPORT (  you need to check the "Advanced" item first in order to see this setting)
        • click "Configure" button AGAIN!!
      • if everything goes well, then the result should look like this:
      • click "Generate" button and wait for the "Generate done" message
    2. VISUAL STUDIO PART
      • go to the build directory, e.g. "C:\vtk\VTK5.10.1\vs10"
      • open "VTK.sln"
      • build them all under the Release mode Release mode Release mode
      • wait a few minutes....(  the needed time depends on your machine )
      • NOTE HERE: building on the release mode is necessary, because if we want to combine VTK and QT together, visual studio project need to be under the Release mode!!This is a tricky part.
      • Until all the project being built successfully, the building process is over.
    3. QT SETUP PART
      • go to "C:\vtk\VTK5.10.1\vs10\bin\Release" and check if there are two file name QVTKWidgetPlugin.lib and QVTKWidgetPlugin.dll 
      • (Note: if they are NOT there, then you must have not check BUILD_SHARED_LIBS)
      • Copy QVTKWidgetPlugin.lib and QVTKWidgetPlugin.dll from "C:\vtk\VTK5.10.1\vs10\bin\Release" to C:\Qt\4.x.x\plugins\designer
      • if everything goes well, then open the QT designer. You will find the VTK WINDOW WIDGET at the bottom of the qt widget list like this snapshot:
    4. ENVIRONMENT VARIABLE SETUP PART ( THE MOST IMPORTANT!!!!! )
      • Add a new environment variable: QTDIR = C:\Qt\4.X.X (or whatever VERSION you installed QT)
      • Append the environment variable PATH to add
        • C:\Qt\4.8.4\bin
        • C:\vtk\VTK5.10.1\vs10\bin\Release

STEP FOUR

  • check whether the environment being setup correctly or not
  • check ITK + VTK + QT
  • check ITK + QT
  • check VTK + QT
    • in the VTK source code, there are a few examples can be used for checking under the Example folder
    • Tutorial Projects
      1. EasyView
      2. SimpleView
      3. Qtevents
      4. qtimageviewer
      5. QtVTKRenderWindows
      6. EventQtSlotConnect


References and other useful links


2014/02/25 update

2013年1月28日 星期一

ITK + VTK + QT + OpenCV VS2010 Project Setup


  • 首先Qt的專案格式:
    • 一般來說有五個檔案
      • Program Driver - 
        • ItkVtkQtProjectApp.cxx
        • 程式開始執行位置並初始化一個GUI
      • Qt Gui file
        • ItkVtkQtProjectGui.ui
        • 這個檔案是用Qt Designer設計來的GUI,當然也可以用hard-coding方式完成,使用的程式語言是XML
      • Gui Functionality spec & implementation
        • ItkVtkQtProjectGui.cxx and ItkVtkQtProjectGui.h
        • 這兩個負責實作Gui的functionality
        • 可以用hard-coding的方式一邊做gui介面,一邊做functionality
      • Qt Gui resources - 
        • ItkVtkQtProjectGui.qrc
        • 專門存放gui可能用到的資源位置,例如icon
    • 專案的檔案都設置好以後進行編譯跟執行時,Qt的meta-object compiler moc會將qt相關的程式部分產生對應的檔案在Generated資料夾下,主要有兩個
      • moc_ItkVtkQtProjectGui.cxx - 根據ItkVtkQtProjectGui.h產生的Meta object code,基本上可以不用動這個檔案
      • ui_ItkVtkQtProjectGui.h - 由ItkVtkQtProjectGui.ui產生的介面,含有C++ code,其中出現的Qt物件會對應Gui的元件以及Gui的Layout
      • 當有需要時,可以來這裡改Gui的設定,除此之外,這兩個不需要特別去動
  • 建立及執行專案
    • 環境設定 - 
      • Window 7 64bit 企業版 + Visual Studio 2010 professional
      • InsightToolkit-4.2.1 + VTK5.10.1 + Qt4.8.4 + OpenCV-2.4.3
    • Cautious:以上使用到的Library必須先正確的在機器上編譯好!
    • Download Project
    • Step 1:
      • 利用Cmake建立專案,過程中如果遇到找不到Library出現Error,就點一下找不到的那個LIBRARY的欄位,接著點右邊的按鈕,明確地給他路徑,然後再點一次Generate即可。
      • 必須直到Cmake皆找到所有Library位置即可,最終結果可能如:
      • Note: 過程中,Cmake可能找到OpenCV的路徑,但是是相對路徑,此時,仍然點OpenCV的欄位,明確地給他路徑,否則之後專案裡面可能會沒有include到OpenCV的Library;如果用不到OpenCV,也可以在CMakeLists.txt中把OpenCV相關的都刪掉,則可以忽略這個Note
    • Step 2:
      • 接著打開專案,在ItkVtkQtProject上點右鍵,將ItkVtkQtProject設成起始專案
      • 改成Release Mode( 非常重要! )
      • Note 1: 編譯過程中compiler可能找不到 「itkImageToVTKImageFilter.h」
        • #include <itkImageToVTKImageFilter.h>,必須在專案屬性頁手動加入這個include檔的原始位置
        • 路徑位置大概在C:\itk\itk-4.2.1\InsightToolkit-4.2.1\Modules\Bridge\VtkGlue\include
      • Note 2: 在執行第一次編譯以前,前面提到的moc_xxx.h 和 ui_xxx.h兩個檔案,會先在實作的code內出現,不過compiler會找不到這些檔案,但是不用擔心,只要執行第一次編譯後,這兩個檔案自然就會出現,程式也可以正常執行
      • 執行結果          
  • 主要概念
    • ITK image 和 VTK image利用itkImageToVTKImageFilter相互連結
    • VTK 和 Qt 利用QVTKWidget連結
    • VTK 和 Qt的差別可以看User Guide或是其他Reference得知,而其中最主要就是利用Qt中signal/slot Connection的概念